Cpdemy is a knowledge driven hive dedicated to producing great how-to, tips and tricks, awesome tutorials on Photoshop, Wordpress, Blogger, SEO
Articles by "Tips"
Showing posts with label Tips. Show all posts
Cpdemy is a knowledge driven hive dedicated to producing great how-to, tips and tricks, awesome tutorials on Photoshop, Wordpress, Blogger, SEO
In this quick guide, am going to show you a way to include your blog or website on opera mini news feed.
Simply follow these simple steps to add your blog to Opera Mini News Feed
First, send an email to this email address @ social-networks@opera.com
You should get a reply from an opera mini agent telling you to write a formal and appropriate request together with your blog or site link that he will forward it to the news feed team. Do what he or she says and reply him or her back with your details.
Next, you have to wait and don't be in a haste as it takes time but the sure thing is that they will definitely give you feedback on what to do after some days if and only if your blog if worth their approval. So you want to make sure that you have enough content in your blog, content that are worth reading, content that someone would love to share, content that is worth their time; you get the point, right?
If your request is approved, an instruction would be given to you, follow it very strictly and get everything done.
Note: This may take months before finishing up the whole processes, so you have to be extremely patient, but the sure thing is that after everything has been completed, your blog / website will start displaying on the opera news feed.
Here are the benefits of your website or blog appearing on Opera News Feed.
- You get more traffics to your blog and Your site / blog and this in turn will make your blog more popular.
- Your blog will be visible to millions of users over Africa, this means that you may earn more if you have any ads on your blog as more views means more impressions and more people visiting your blog can also mean more ads click and of course more money to your account.
- I guess this is the main part you've been waiting for, adding your blog/website and serve as another revenue source for you; By displaying your blog or site on the opera mini news feed, opera will be paying you 50% of their revenue as they will be able to advertise their products to users reading your contents in the news feed.
If you liked this article, then please subscribe to our YouTube Channel for video tutorials. You can also find us on Twitter, Instagram and Facebook.
Cpdemy is a knowledge driven hive dedicated to producing great how-to, tips and tricks, awesome tutorials on Photoshop, Wordpress, Blogger, SEO
In this awesome tutorial, I will show you step by step how to delete the Windows.old folder from Windows 10 without using any extra software, but using a Windows utility called "Disk Cleanup".
This utility is included in every Microsoft Windows version. Using Disk Cleanup is probably the best and safest way to completely delete this folder.
What is the Windows.old Folder? Have you ever tried to Install Windows OS on a system without formatting the Drive? If yes, you would have noticed the Windows.old folder on the C drive of your computer. The Windows.old folder contains the previous version(s) of Windows installation(s).
This folder can take up a lot of disk space and it is safe to delete it, but if you think that someday you might want to downgrade from Windows 10 back to the previous version, then don't delete that folder, because deleting the Windows.old folder can't be undone.
You can't just delete this folder like you do with normal folders and files, but you will need to use a built-in Windows tool called "Disk Cleanup" to properly and safely delete this folder and this tutorial will show you step by step how to use this tool.
Where is the Windows old folder in Windows 10?
You can find the Windows.old folder at This PC > Local Disk (C:) > Windows.old.
1. Open File Explorer (Windows Explorer - This PC[Windows 8 & 10]). (You can use the shortcut Window + E)
2. Open "Local Disk (C:)".
3. You will find the folder located underneath the Windows folder.
Can I delete the Windows old folder after installing Windows 10? Yes, you can delete the Windows.old folder after installing Windows 10. However, it is very important to bear in mind that after deleting this folder, you will no longer be able to roll back to the previous version of Windows.
Is it safe to remove the Windows old folder?
Yes, In fact it's 100% safe to delete the Windows.old folder. However, you should keep in mind that after deleting this folder, you will no longer be able to roll back to the previous version of Windows.
Can't Delete the Windows.old Folder from Windows 10?
If you can't delete the Windows.old folder from Windows 10 using the disk cleanup tool, then don't worry, because Windows 10 will automatically remove the Windows.old folder one month after you upgraded.
Note: Deleting the Windows.old folder can't be undone.
1. Open Disk Cleanup.
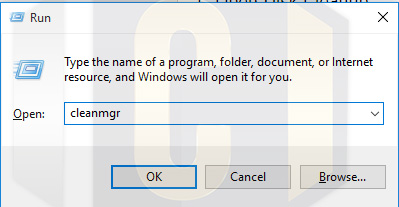
Type Window + R to open the Run dialog box
type cleanmgr

2. If the "Disk Cleanup: Drive Selection" window appears, then select the Windows drive (usually it's the (c:) drive) and click on "OK".
Windows will now calculate how much disk space you will be able to free on your drive.
3. Click the "Clean up system files" button.
5. Check the box next to "Previous Windows installation(s)".
Note: If you want you can delete the other files as well. Just check everything you wish to delete.
6. Click "OK".
See also: Windows 10 Tip: Quick Way To Take A Screenshot Using Keyboard Shortcuts
7. Click "Delete Files".
Disk Cleanup will now safely delete the Windows.old folder from Windows 10.
Conclusion:
At the end of this tutorial, you should now be able to clean windows.old folder, this step can also be used to clean up other system files to free disk space.
Worth sharing huh? Sharing is loving, please share
If you liked this article, then please subscribe to our YouTube Channel for video tutorials. You can also find us on Twitter, Instagram and Facebook.
Reference(s):
· CNET: How to delete the Windows.old folder from Windows 10
· HowToGeek: What is the Windows.old Folder and How Do You Delete It?
Cpdemy is a knowledge driven hive dedicated to producing great how-to, tips and tricks, awesome tutorials on Photoshop, Wordpress, Blogger, SEO
Assuming you accidentally end up closing a tab in your browser, say you have the intension of just clicking on a tab, but instead you close it. The following is how to recover your tab in various browsers.
How to Recover Accidentally Closed Tabs in Chrome
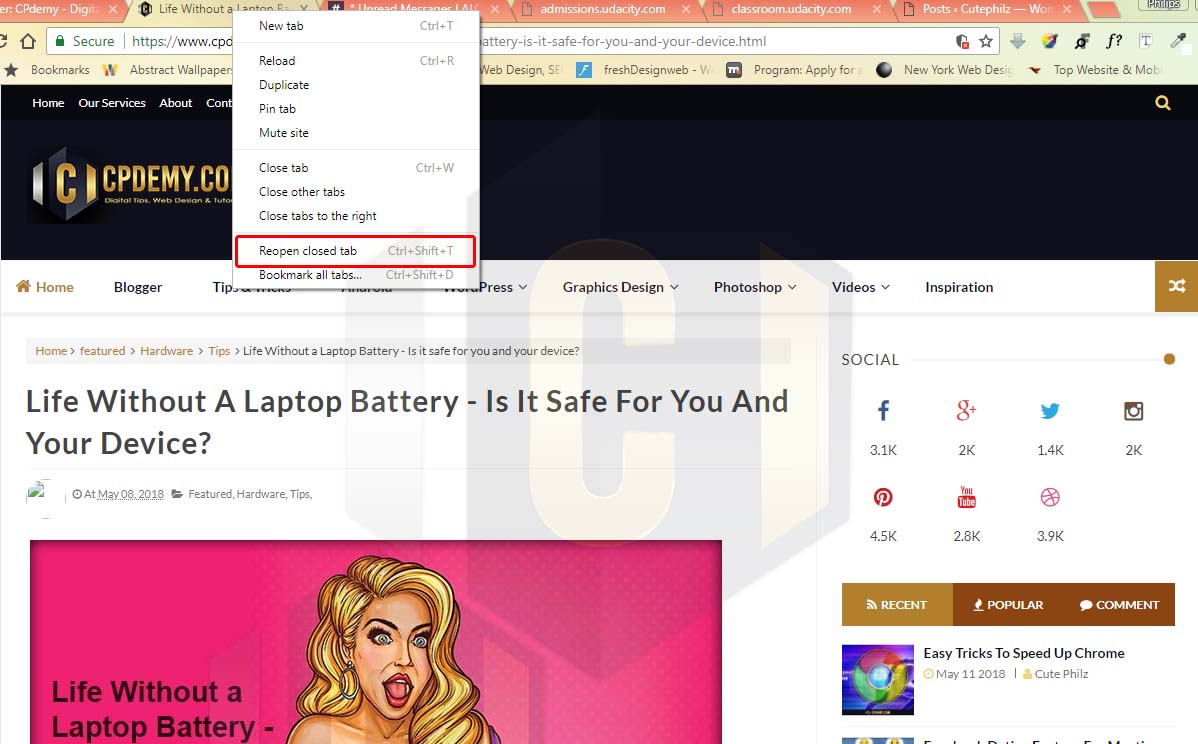
To open the last tab you closed, simply right-click on the last tab bar. Towards the bottom you’ll see the option to open the last closed tab.

By clicking on it once, it will only open one tab. If you closed more than one tab, just repeat the process, and the tabs will appear in the order you closed them. You’ll also get the same options if you click on the space to the side of the tab.
You can also use the keyboard shortcut Ctrl + Shift + T. It works just like the previous option, and it will also open the tabs in the order you closed them by repeating the process. [ I always use this]
How to Reopen Closed Tabs in Firefox You can also recover your closed tabs in Firefox. The process is just as easy as it is in Chrome. Right-click on the last tab and click on “Undo Close Tab.” Just like Chrome, repeat the process until you open all desired tabs.
Conclusion
I guess we can now say good bye to those panic attacks when you close an important tab. As you can see, it’s very easy to recover them, even if it’s been over a week since you closed it.
You can still try the shortcut in other browsers like opera and see if it works for you. Don’t forget to leave a comment below and let us know.
Cpdemy is a knowledge driven hive dedicated to producing great how-to, tips and tricks, awesome tutorials on Photoshop, Wordpress, Blogger, SEO

Chrome is the most popular web browser in the world, and a big part of that is thanks to the fact that it’s one of the quickest. The fact that it spreads itself out across multiple processes on your PC means it takes advantage of your computer’s memory to speed up your browsing in ways that something like Firefox doesn’t (for now).
But that doesn’t mean you can’t crank even more speed out of Chrome if you fancy it. Here are the best ways to speed up the already-speedy browser.
1. Clear the Chrome Cache
Your cache is generally designed to make pages load quicker by storing crucial information about them on your PC, then pulling it up each time you return to that page. But if you don’t maintain it, it can get filled with outdated cache information for certain sites, which then prevents the up-to-date site information from taking its place. Clearing your cache can therefore help speed up Chrome.
To clear your cache, carry out the following steps:
1. In Chrome either press Ctrl + Shift + Del on your keyboard or type chrome://settings/clearBrowserDatainto the address bar.
2. Make sure the “Cached images and files” and “Cookies and other site data” boxes are ticked (and any other browsing data you want to clear), select “the beginning of time” in the dropdown at the top, then click “Clear Browsing Data”.

Your cache is generally designed to make pages load quicker by storing crucial information about them on your PC, then pulling it up each time you return to that page. But if you don’t maintain it, it can get filled with outdated cache information for certain sites, which then prevents the up-to-date site information from taking its place. Clearing your cache can therefore help speed up Chrome.
To clear your cache, carry out the following steps:
1. In Chrome either press Ctrl + Shift + Del on your keyboard or type chrome://settings/clearBrowserDatainto the address bar.
2. Make sure the “Cached images and files” and “Cookies and other site data” boxes are ticked (and any other browsing data you want to clear), select “the beginning of time” in the dropdown at the top, then click “Clear Browsing Data”.

2. Suspend Tabs You’re Not Using
The reason is because tabs that continue to run in the background continue to hog your system resources. Instead of just closing those excess tabs, though, you can enable a Chrome flag that suspends tabs you’re not using, then re-enable them when you click them, saving on memory.
To enable this, type chrome://flags in the URL bar, then type Ctrl + F and search for “tab discarding.” When you see it, click the dropdown box, select “Enabled,” and restart Chrome.
The reason is because tabs that continue to run in the background continue to hog your system resources. Instead of just closing those excess tabs, though, you can enable a Chrome flag that suspends tabs you’re not using, then re-enable them when you click them, saving on memory.
To enable this, type chrome://flags in the URL bar, then type Ctrl + F and search for “tab discarding.” When you see it, click the dropdown box, select “Enabled,” and restart Chrome.
3. Compress Sites as They Load
If you’re using a PC, there’s a good chance you’re in a position where you don’t need to worry too much about how much data you’re using each month. But data-saving can also have the desirable effect of speeding up Chrome.
Google offers its very own Data Saver extension for Chrome that works in much the same way as the built-in feature in the Android version of Chrome. It compresses most websites (aside from encrypted HTTPS ones) as it loads them, meaning there’s less info to load and therefore the page loads faster. Simple.
4. Use an Ad-Blocker
Not all ads are bad, and you should certainly suffer through them and switch off any ad-blockers on sites that you respect and enjoy reading. But let’s face it, in 90% of the situations you’ll want to avoid them.
This isn’t just for the reason that they’re ugly, annoying, and sometimes have the cheek to take up your entire screen, but they force your browser to load more elements which puts strain on your PC.
You probably don’t need an invitation to do this, but use an ad blocker. Adblock Plus is a classic, and Ghostery is nice as well if you want to fine-tune what kind of ads you are and aren’t happy to see.
This isn’t just for the reason that they’re ugly, annoying, and sometimes have the cheek to take up your entire screen, but they force your browser to load more elements which puts strain on your PC.
You probably don’t need an invitation to do this, but use an ad blocker. Adblock Plus is a classic, and Ghostery is nice as well if you want to fine-tune what kind of ads you are and aren’t happy to see.
5. Turn on Hardware Acceleration
The graphics card in your computer – whether a rudimentary integrated one or the latest nVidia beast – is an invaluable part of keeping your browsing zippy. In Chrome you can use “hardware acceleration” to utilize your graphics card power for more graphically intensive browser processes.
You can enable hardware acceleration by going to your Chrome Settings and clicking the menu icon at the top left -> Advanced -> System. Next, click the slider next to “Use hardware acceleration when available” to switch it on.
If you’re interested, you can have a look at what aspects of Chrome hardware acceleration are affected by going to chrome://gpu/.
The graphics card in your computer – whether a rudimentary integrated one or the latest nVidia beast – is an invaluable part of keeping your browsing zippy. In Chrome you can use “hardware acceleration” to utilize your graphics card power for more graphically intensive browser processes.
You can enable hardware acceleration by going to your Chrome Settings and clicking the menu icon at the top left -> Advanced -> System. Next, click the slider next to “Use hardware acceleration when available” to switch it on.
If you’re interested, you can have a look at what aspects of Chrome hardware acceleration are affected by going to chrome://gpu/.
Conclusion
Implementing just one of these settings might not have a profound impact on your browser, but add them together and you’ll start to see the benefits. If you follow these tips, then you’re clearly someone who cares about the speed of your browser anyway and probably already do your due diligence in not having too many extensions, tabs and so on straining Chrome.
Have any of your own tips to speed up Chrome? Share them!
Cpdemy is a knowledge driven hive dedicated to producing great how-to, tips and tricks, awesome tutorials on Photoshop, Wordpress, Blogger, SEO
Normally some of us take screenshot of the Pictures Status but how about the Video - Some people go through the process of downloading Screen Recorder to record the video or beg the friends to sent it to them. But sometimes, these methods fails as the screenshot may produce low quality images and the Videos produce bad sound.
So what exactly is the best way to save whatsapp Status. In this quick tip, am going to point out two easy ways to do this.
It has been a lot of data zapping since Whatsapp introduced status to its features, you can upload pictures, videos ( video duration cannot be more than 30 seconds or they automatically get split) or even write on your status.
First Method
Note: You will need a File Manager app to perform this. You can find it by looking for an app named “Files” or “File Manager”. If there is none (like on Nokia Android phones), you can download and use Solid Explorer or ES File Explorer.
It has been a lot of data zapping since Whatsapp introduced status to its features, you can upload pictures, videos ( video duration cannot be more than 30 seconds or they automatically get split) or even write on your status.
First Method
Note: You will need a File Manager app to perform this. You can find it by looking for an app named “Files” or “File Manager”. If there is none (like on Nokia Android phones), you can download and use Solid Explorer or ES File Explorer.
Step 1: View the status which you want to save. This will make a temporary copy of the same on the phone’s storage.
Step 2: Open your File Manager app – Files, File Manager,
Step 3: On the top right corner of your file manage, Click options (the 3 dots) and Enable “show hidden files”.
Step 4: Navigate to the WhatsApp folder – Internal storage > WhatsApp > Media > .Statuses.
Step 5: Copy the photos/videos which you want to save.
Step 6: After this Paste into a different folder.
Second Method
Save status files using a dedicated app
You can avoid the complexity and rely on a 3rd party app to save your friend’s WhatsApp Status. The app will automatically collect the statuses which you have seen and show them in an organized manner.
- Open WhatsApp and vew the statuses which you need to save/download.
- Open Play Store on your Android and install – Stories saver for WhatsApp. You can also click on link below to open it in your browser/Play Store.
Developer: mccart
Price: Free
Allow the app to access photos, media and files on your device. Because that’s how the app will read the storage to collect WhatsApp Status images.
Select the images or videos which you want to save and tap on the Save icon ().
Images which you save will be moved to Saved tab. You can access them any time you need.
All saved statuses will be accessible from within the app. If you need to access the folder directly, you can open your File Manager app and browse to Internal storage > Pictures > WhatsApp Stories.
Worth sharing? Please share on Facebook or Twitter. It helps more people see it.
Images which you save will be moved to Saved tab. You can access them any time you need.
All saved statuses will be accessible from within the app. If you need to access the folder directly, you can open your File Manager app and browse to Internal storage > Pictures > WhatsApp Stories.
Worth sharing? Please share on Facebook or Twitter. It helps more people see it.
Cpdemy is a knowledge driven hive dedicated to producing great how-to, tips and tricks, awesome tutorials on Photoshop, Wordpress, Blogger, SEO
Disclaimer: Please this tip is only for education purpose. I will not be held responsible for any illegal action done with this.
As we all know almost all browsers offer us the option to save passwords for some particular sites. Most of the time we just forget our password, but still it is save in your browser. As browsers automatically convert the password into stars or asterisks we simply can’t see the password.
Fews years ago, I learnt this tip from a very good friend and am making a quick tip out of it today; below is a method which allows us to reveal the password hidden behind the starts, dots or asterisks.
As you might already know, webpages are coded in html, so by changing some values in the html code, we can easily see the password hidden behind the dots or stars.
So to do this we are going to use the web developer option which is present in almost all web browsers.
Steps to See Password Behind the Stars
- Navigate to the website which contains your saved password.
- Right click the password box where your password is saved and select Inspect element.
Now you could see a bunch of code under the element tab. Just look for type=”Password” in the highlighted area.
After you found it, double click password and change it to text as shown below.
Now hit enter and the text behind the stars, dots or asterisks will be revealed.
The above method works for all web browsers. But if you are a Mozilla Firefox user then you can directly use an add-on which easily reveals the password hidden behind the dots in single click.
Conclusion: As I have to maintain a lot of websites for my clients, I usually forget some of them and sometimes I find it difficult to open my password saver and start searching for password, so this tip helps me a lot to be able to view the password I used in a particular site. And again, don't use this tip for illegal purposes.
- Navigate to the website which contains your saved password.
- Right click the password box where your password is saved and select Inspect element.
Now you could see a bunch of code under the element tab. Just look for type=”Password” in the highlighted area.
After you found it, double click password and change it to text as shown below.
Now hit enter and the text behind the stars, dots or asterisks will be revealed.
The above method works for all web browsers. But if you are a Mozilla Firefox user then you can directly use an add-on which easily reveals the password hidden behind the dots in single click.
Conclusion: As I have to maintain a lot of websites for my clients, I usually forget some of them and sometimes I find it difficult to open my password saver and start searching for password, so this tip helps me a lot to be able to view the password I used in a particular site. And again, don't use this tip for illegal purposes.
I hope you enjoyed this tutorial.
Tutorial Credit - Joshua Oris
Cpdemy is a knowledge driven hive dedicated to producing great how-to, tips and tricks, awesome tutorials on Photoshop, Wordpress, Blogger, SEO
What's popping pals. Today we're going to be looking at the difference between a Domain and a Website. Normally, people differentiate between a Domain and Hosting but recently someone asked me whether a domain is a website. So here is what I've got to say about this.
Using many reference from the internet, I've come up with this tip.
First, when the word Domain comes to mind, what do you think of? You can think of a Domain as an area of territory owned or controlled by a particular ruler or government. ( I don't think that was the answer you were actually looking for but is very similar).
Every website is identified by a unique series of numbers called an IP address. This numeric set is what your computer uses to connect to the server where the website data lives.
For someone to access your website they need to type in your domain name. Computers communicate using something called an IP address, which looks something like this: 127.0.0.1. If you type in the IP address that’s associated with your domain name you’ll end up seeing the same exact result as what you would see if you typed in your domain name.
It’s highly unlikely anyone will remember a random string of numbers, (imagine if an alternative name for your dad is 192.168.0.1, which would be easier to remember, Dad or 192.168.0.1?) so your domain serves as a more user-friendly version of your IP address. Your domain acts as an easy to remember way for your visitors to access your website. Take for example CPDemy.com.
There are two parts of your domain name: the TLD and the actual domain name. The TLD is the part of the domain name that follows the bulk of your domain.
For the domain name cpdemy.com, .com is the TLD(Top Level Domain). When choosing your domain you’ll notice there are a number of top-level domains available. They all have different connotations, so make sure you choose wisely.
Now for better understanding just think a domain as a distinct subset of the Internet with addresses sharing a common suffix or under the control of a particular organization or individual
On the other hand, What Is a Website?
A website is a collection of web pages on the world wide web (what you know as the Internet), that lives on a certain domain name.
Your website is actually more like a living entity. It’s based upon the relationship between your site files, your web host, and your domain name. If any one of these three aren’t working, your website won’t display.
The bulk of your website will be comprised of web pages, which are documents written in a variety of web languages, usually HTML, CSS, and some form of JavaScript. These act as instructions for the web browser for how your website will actually display.
How They Work Together
As you can see from above, your website and your domain and intricately tied. You need both, along with a web host(You can think of the web host as the Government that is in control of your domain), for anything to be available to your visitors.
Your domain name points to your web server where all of your files are hosted and those files are generated when a user types in your domain name to display your website.
Conclusion
From the explanation above, I hope you've got a clearer understanding of the difference between a domain and a website and how they function together.
If you need a website or a blog, you can contact me, if you want to do it by yourself, that great, Hostgator is a great place to start.
Any other question, let me know and I'll do my best to clarify you. If you have a better answer, would love to see it in the comment and make an update to this post.
Thanks, Don't forget to share
Cpdemy is a knowledge driven hive dedicated to producing great how-to, tips and tricks, awesome tutorials on Photoshop, Wordpress, Blogger, SEO
Without a battery, a laptop can still work very fine without affecting the computer performance or harm it in any way.
There is no reason why a laptop wouldn’t work just fine without the battery in it, as long as you take a few aspects into account.
First of all, make sure you’re using the original power adapter that came with the laptop. Power variations could cause components on the laptop’s motherboard to fail, which is something that the battery can prevent, by acting the way a UPS would.
And speaking of power, you probably shouldn’t use a laptop without a battery if you live in an area where high-intensity electrical loads are likely. If you know that you don’t have good quality electrical current, don’t do this, or use a UPS too. That way you can make sure that your laptop doesn’t suffer any damage in the event of a high load. Not to mention a UPS is essential anyway as you won’t lose your work in the case of a power outage, and they act as a surge protector too.
Another important thing is never to remove the power cord from the laptop when the laptop is working, as that could cause damage to its components.
Also, don’t touch the battery contacts when it’s plugged in. They are well hidden in the case of most laptops, but you could get a bit of a jolt. It’s pretty low-voltage — most of them are at 24V maximum.
And remember only to take out the battery when the laptop is turned off and unplugged.
Battery Care Tip
If you’re doing this in order to protect your battery, which makes sense if the laptop doesn’t go anywhere and only sits on your desk, make sure you charge the battery to around 40% before taking it out and storing it. To maximize its life, you can store in your fridge, in a Ziploc bag.
If you don’t want to do that, you should at least do a full charge-discharge cycle periodically. This should prolong your battery life.
Conclusion
As long as you take some common sense precautions, using a laptop without its battery shouldn’t cause any problems — just make sure that you use a rubber band to prevent the power adapter from falling off the table.
Reference: GroovyPost
Cpdemy is a knowledge driven hive dedicated to producing great how-to, tips and tricks, awesome tutorials on Photoshop, Wordpress, Blogger, SEO
WordPress is a Content Management System that Powers more than 30% Websites, and the best part is that it's Free, you only need to pay for your Domain and Hosting.
At times, Websites running WordPress can slow down for any number of reasons. It could be anything from bloated code, a rogue plugin or poor hosting performance. Figuring out what’s slowing you down is hard enough. Harder still is that some methods for increasing speed (caching plugins, for instance) are full of cryptic settings.
It can all add up to something of a nightmare in diagnosing and fixing what would seem to be a simple problem.
Tips for Increasing Speed
WordPress, by itself, is not a slow platform. But adding components like themes and plugins can weigh it down. Combined with database clutter and potential hosting issues, a site can really slow to a crawl.
Here are a few things to take into account when you’re looking to increase speed:
Avoid Heavy Themes
Just because a theme calls itself “minimal” doesn’t mean that it’s lightweight. A theme may sport a minimalist look but still load a ton of scripts that will slow you down.
If you’re using a third-party theme, check the documentation to see how to disable scripts you don’t plan to use. Otherwise, use a lightweight starter theme and build for what you need.
Use only Needed Plugins?
Each plugin you install and activate can add scripts, styles and database entries. Before you install a plugin, do some research to see if it’s known to cause any issues with load times. Ask yourself if it’s really a necessity for the success and security of your site. If not, you may want to move on for the time being.
Use A CDN
CDNs or Content Delivery Networks help deliver static files of your website faster to your visitors from a server location much closer to them than your site’s servers. This makes a website that normally fast seems even faster. A CDN ensures that your visitor hits the cache rather than reach your servers. And accessing the cache as opposed to requesting site data from servers is much faster.
Almost all high traffic websites now use a CDN for their static content. CDNs like MaxCDN have solid state drives strategically located all over the globe to provide the ideal global content delivery service to websites with a wide demographic reach, as you can see from the image below.
Watch for Missing Content
Whether local or remote, look out for any scripts or stylesheets that fail to load. A missing file can cause your site to react incredibly slowly, along with possible display and functionality consequences. Use a tool like Pingdom or GTmetrix to analyze your site. Both tools offer a “waterfall” view that shows how long it takes for each file to load along with your page. If one of these files generates a 404 error, you’ve found the culprit.
Take Note of Hosting Limitations
Not all web hosts are created equal. Some just flat-out provide a better product. But you should also be aware of some hosting-related issues that can cause a slowdown. Being on an overcrowded server, running a non-supported (old) version of PHP or having too much traffic on a shared hosting account can all cause problems. And most importantly avoid all these mom and pops hosting promising to offer you best service. Try check out their reviews to see if they're worth your money.
Optimize Images
Using Very high size images can cause your website to run very slow, image have about 1MB Pictures of about 5 to 10 on a single page, of course the website has to load all of them and hence may do this very slow especially if you have a low bandwidth and there are many people accessing your website at the same time. Optimizing Images becomes very essential.
You can use a Software like Photoshop to resize your images or you can also use sites like postimg.cc to upload your image and then link it to your site, this can aid to increase the speed of your Website.
Alternatively, you can use Compress JPEG & PNG Images plugin for the same. They promise a compression in size by about 40% – 60% for JPEG images and 50% – 80% for PNG images, without a visible and obvious loss in quality.
Go to Settings > Discussions, under Default Article settings disable the pingbacks and trackbacks.
Or we can use a plugin that can deal with spam, like WP SpamShield Anti-Spam. And that’ll be the end of spam in any form.
Disable Hotlinking
Hotlinking is a means by which people use the content that is a host on your site’s servers for their own websites. So basically they use your servers with your content on their site. And as a result, your server gets loaded with no benefit to you whatsoever.
How do you stop someone from stealing your server resources?
To prevent people from hotlinking stuff from your site’s content. Some tinkering with your site’s code is required. You can use this tool from htaccesstools.com to generate the necessary code which you can add to your server. Normally, your host will also be willing to help you with this.
And once you prevent hotlinking, you can be certain that your server resources are not spent hosting content for a website other than your own. Hotlinking tactics generally target images and other multimedia which are data heavy, so if you run a site with minimal imagery, disabling hotlinking will not have any effect on your site’s performance.
Disable Pingbacks and Trackbacks
Trackbacks and pingbacks are used to let you know that someone else has put a link of your post on another blog or site. Trackbacks are manual and pingbacks are automatic, they both end up in your comment moderation. 99% of all trackbacks and pingbacks are spam. And if you start getting too much of it, your site speed can potentially be affected.Go to Settings > Discussions, under Default Article settings disable the pingbacks and trackbacks.
Or we can use a plugin that can deal with spam, like WP SpamShield Anti-Spam. And that’ll be the end of spam in any form.
Cpdemy is a knowledge driven hive dedicated to producing great how-to, tips and tricks, awesome tutorials on Photoshop, Wordpress, Blogger, SEO
A managed WordPress site is a website that is hosted on a managed WordPress host. Essentially, you’ll be outsourcing the hosting of your site to a team of WordPress experts. If you run a high-traffic WordPress site, then going with a WordPress managed host could be a great option for you. Below we explore what managed WordPress hosting is, and the benefits it can offer your site, so you can determine if it’s time for you to switch up to WordPress managed hosting.
What Is Managed WordPress Hosting?
Managed WordPress hosting is a streamlined hosting environment that’s optimized to help you build and run WordPress websites. The goal of this style of hosting is to ensure your site is running at peak performance, with high levels of security. A managed host will also take care of general administrative tasks like updating your site, maintaining security, and monitoring traffic levels. By hosting your site on a managed WordPress host you’re effectively outsourcing your hosting to a third-party of experts, so you can focus on growing your site instead.
The Benefits of WordPress Managed Hosting
Having a managed WordPress site just requires a switch to managed WordPress hosting. Below we explore the main benefits your site will receive when you make the jump to a managed hosting environment.
1. Improved Speed and Performance
When you utilize a WordPress managed server everything to do with the server environment will be optimized to get the most out of WordPress. That includes the server configuration, the hardware, the software, and the databases. Your WordPress site can become slow for a variety of reasons, whether onsite or having to do with your server environment. With regular monitoring, the team behind your site will be able to diagnose and solve any performance issues before they become a problem.
2. Easier to Scale Your Site
If your site prepared for when an post goes viral, or you get featured by a major media outlet? Most sites will fail when they receive a large spike in traffic. Instead of visitors seeing the article or homepage, they’ll get nothing more than an error message. Managed WordPress hosts are built to scale. With traffic monitoring features the team behind your site will be able to scale your site’s resources at a moments notice to handle the flood of traffic.
3. Greater Levels of Security
Most people don’t want to admit it, but there’s a chance your site could be hacked. Security is typically the farthest thing from people’s minds. Why would somebody want to hack my site? The last thing you want is to wake up one morning and realize your site’s been hacked. Then, you have to go through the process of fixing your site, which can be a real headache if you don’t have solid technical skills. With a managed WordPress host your server environment will be much more secure. Plus, since they’re WordPress experts they’ll be well aware of any common security holes and vulnerabilities and be able to patch the issues effectively.
4. An Expert Support Team Behind You
A lot of support teams will only be able to help you with the actual server hardware when something goes wrong. So, if the issue is with your site, then you’re left on your own, having to search through Google looking for the magic fix. A managed WordPress host will not only be able to diagnose and solve server and hardware issues for you. But, they’re also staffed by a team of WordPress experts that will be able to help you troubleshoot any issues that might arise. And of course, the goal of a solid managed WordPress host is to help you avoid experiencing any site issues in the first place.
5. Automated Website Backups and Updates
Backing up your website is incredibly important, but usually, it falls by the wayside if you have to figure it out yourself. However, with a WordPress managed host your site will be backed up automatically. The frequency of the backup will depend upon your host, but usually, it’s on a daily or weekly basis. Beyond backups the other task you’ll have to take care of yourself is updating your WordPress core, themes, and plugins. Failing to update these in a timely manner will make your site more vulnerable to attacks. Luckily, with WordPress managed hosting all of your updates will be handled automatically. Whether or not your plugins will be updated as well depends on the host.
Is Managed WordPress Hosting Right For Your Site?
Managed WordPress hosting gives you the freedom and time to focus on growing your site, not managing your hosting. If you’re running a high traffic WordPress site and you want to improve its performance and security without any added work on your end, then WordPress managed hosting is an option worth considering.
Need a website? Contact me, Nice looking and appealing website to showcase your brand with a perfect SEO. Here's my contact 2348106919811
Visit our website today, Emsmart Technology for great offers
Need a website? Contact me, Nice looking and appealing website to showcase your brand with a perfect SEO. Here's my contact 2348106919811
Visit our website today, Emsmart Technology for great offers
Source: hostgator
Cpdemy is a knowledge driven hive dedicated to producing great how-to, tips and tricks, awesome tutorials on Photoshop, Wordpress, Blogger, SEO
Digital marketing becomes inevitably part of business marketing in general. Taking advantage of the Internet as a useful marketing tool is a powerful way to promote your local small business and gain more clients.
In this quick tip, am going to talk about the common areas that should be covered if you wish to be successful when promoting your business online.
1. Invest in a good website
The Internet has been and is still turning the world around like never before, therefore if your small business doesn’t have a website yet, you should consider building one. A website is a collection of different pages hosted online that gives a nice and wonderful presentation of your brand. It helps introduce potential customers to products or services you offer. It highlights everything your company does, so that potential customers can decide whether they like it or not.
It is mandatory to make your website responsive – this means your website must be mobile and tablet friendly to follow recent trends and satisfy customers on-the-go.
It is also neccessary to update your website regularly like a blog so you could help customers find you and know what you do and keep customers engaged. Also, make sure your contact info is listed on every page of the website. An appealing, well-managed website is the prerequisite to internet marketing.
If you need help, here are two companies that provide very cheap web services in Nigeria: EmSmart Technology and Cutephilz Technology
2. Verify your Google Business Listing
Connect your website to Google Business Listing to increase the possibility of your business being listed on top of search engines. This is very important so that your website and contact information will be found on search engines. This way, potential customers interested in the industry could quickly find your company and get in touch.
Choose the right internet marketing strategy for your business
3. Facebook Ads
As part of internet marketing, social media, in general, has made a great impact on promoting businesses. Whether you wish to connect with much more customers, or share updates about your products/services, online marketing on Facebook helps your business to build lasting relationships with the public. When creating an ad, Facebook allows you to target specific areas, or lifestyles, closely related to your business. You can also include the option “Call now”, “Learn more”, etc.
4. Facebook Events
As mentioned above, Facebook has become a very powerful tool to connect with the public, build new business relationships, increase contacts, etc. Thus, Facebook Local Business page allows you to create events that will be displaying in your area. This way, your business will be more visible to potential customers and engaged in your community.
5. Connect via Twitter
Just like Facebook, Twitter is a very excellent way to make your small business visible. You should post news on a regular basis and use a specific hashtag to target specific followers. For example, #cpdemy #design might bring a lot of people interested in design to your page, or if you use local hashtag #Nigeria, you could gain interest from Twitter users in your city.
There are many benefits of Digital marketing for businesses, but the most important is to find the right fit for your area of expertise. Being a part of the Internet can save your time, space and can benefit your business. Make sure you choose the right strategy.
If you need any help, you can contact me directly. If you have a website already, I can help you with SEO and Content Writing for your website at a very affordable price.
You can also contact these web Agencies for Very affordable Websites.
Subscribe to:
Posts (Atom)